But, today I wanted to share a new hobby of mine! I have always loved crafting and creating, but my funds (and storage) are super limited. When my mom came across an old church that was getting new windows (and tossing their old ones in the trash) we decided there had to be something we could do to re-purpose them.
And they turned out looking like this:
1. First window for my sister's bridal shower gift:

2. Second window for a friend's wedding gift:

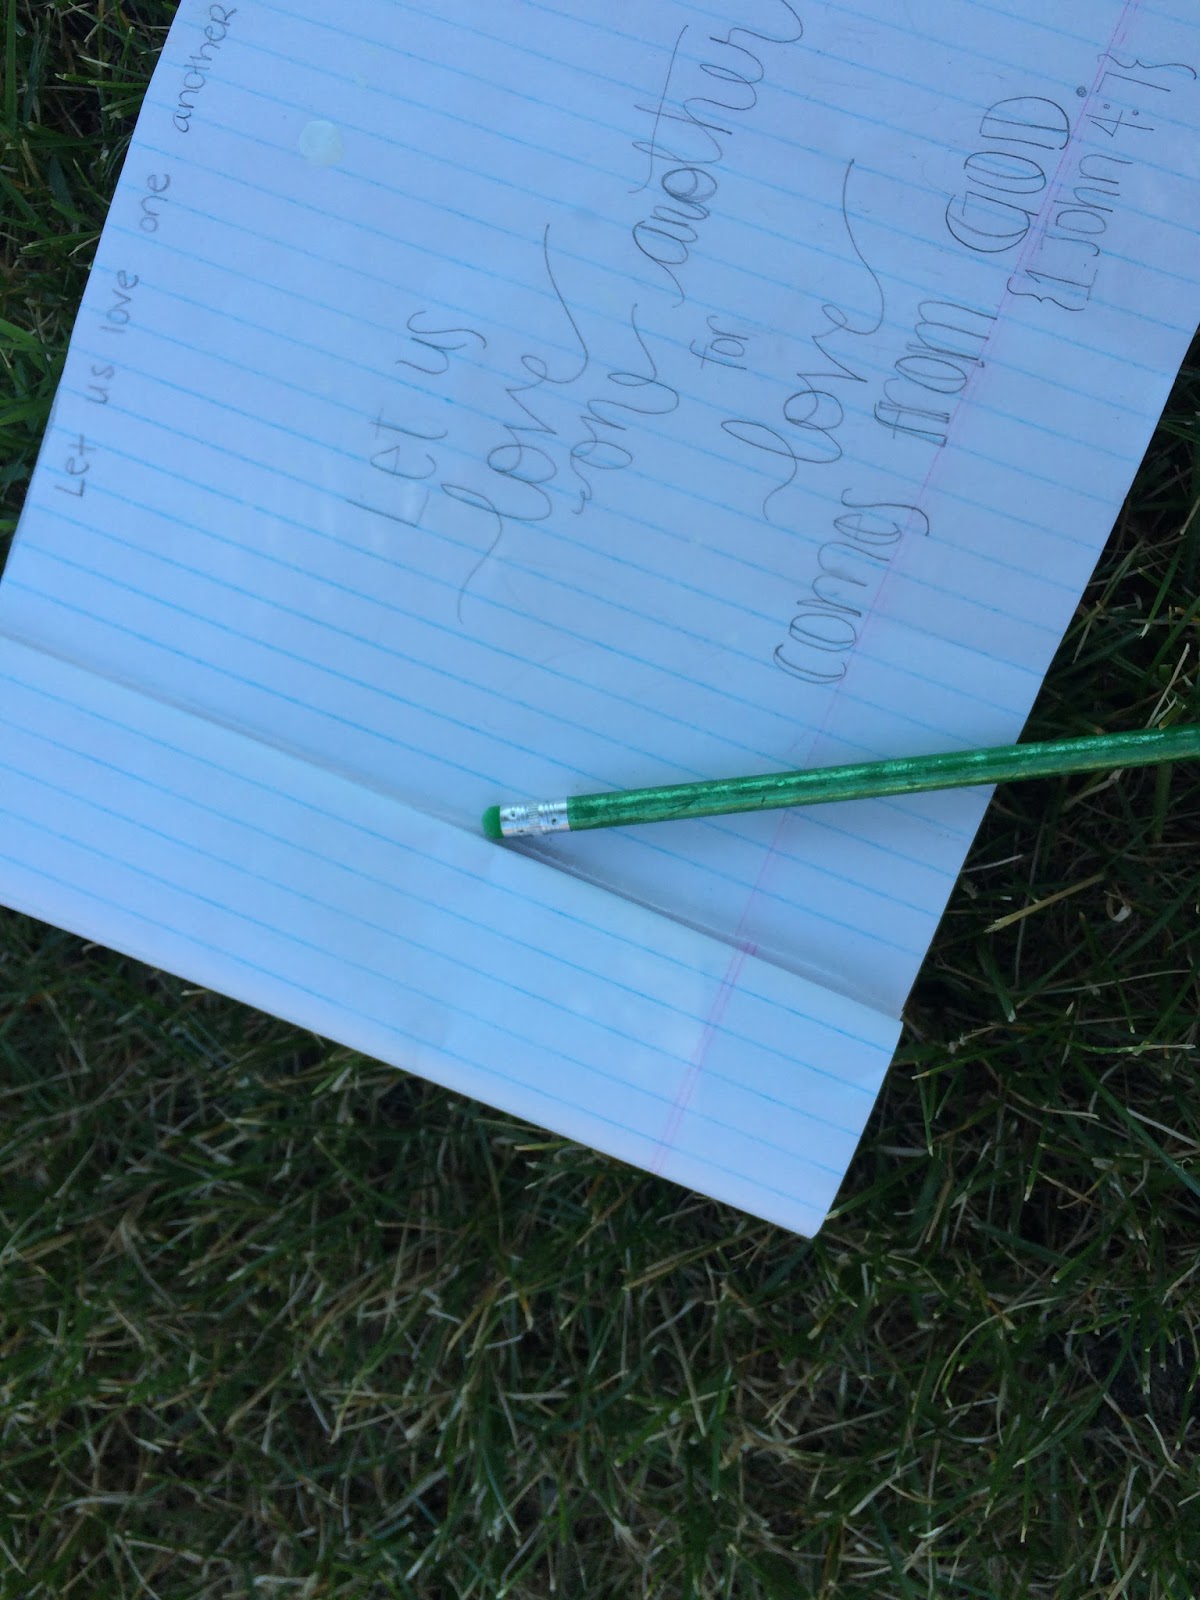
3. Third window for my sister's house warming gift:

4. Fourth window for a friend's house warming gift:
(Picture coming soon!)
As long as our window supply lasts (I think we have like 10-15 more sitting in the shed!) I will keep trying to come up with different people to give them to/sell them to (more on that later!) and different ways to use them. They really are very easy to do...so if you ever want to try, here is the process I used:
Materials:

Chalk Paint (I recommend Dutch Boy brand, found at Menards)
Paint Marker
Wax Finish
Windex/Water
Sanding/Stripping Supplies
Cheap, Coarse Paintbrush
Heavy Picture Hanging Kit (I recommend Ook brand, up to 30 lbs)
Old Window
Tarp or Garbage Bags
Painter's Tape or Razor Blades
Cheesecloth
Procedure:
1. Clean glass on both sides before you start. Old windows can be quite...filthy.


3. Lay window on tarp/garbage bag to paint. Heavily coat one side of window with paint. Be sure to get all the small cracks, metal fixtures, and even the beveled edge that attaches to the glass. If you choose to use painter's tape, make sure it is laid on the glass and pressed right up against the wood. I have found that it's easier to messily paint first and use a razor blade to tidy up the glass afterwards.
 |
| Sometimes you just gotta catch up on The Voice re-runs as you craft. |


4. After that side is dry (usually close to 1 hour of wait time), flip the window and repeat step 3. It is worth noting that from the opposite side you should again pay careful attention to the deep cracks in the sides of the window. Even when I thought I painted everything, I would notice bare spots once I flipped the window over.
5. Even though most chalk paints claim a one coat coverage, I always do two.
6. Using a flat razor blade, carefully scrape off all the excess paint that landed on the glass, if you did not use painter's tape. This also comes in handy when you make multiple mistakes on step 9!


7. Using your sanding materials, distress the places on the window that would naturally wear away: corners, around fixtures, and edges. I have noticed this sometimes alters the color of the paint you have used to a lighter shade.


8. I recommend using Windex/water to re-clean both sides of the window at this point. It's probably quite dusty again!
9. Using a paint marker, write the word/drawing that you desire to be the focus of the window. I always sketch my idea first with a pencil on a piece of paper and then look at that to help me draw it on the window. You could also trace something easily through the glass, if that's easier for you. When I know what I want to write but don't know how to format it, I often look online for different fonts or styles to use. These pictures show how I go in stages to get the look I want: Write it quickly for spacing/size, then scrape off any mistakes and slowly bold the letters I want to emphasize.


10. Place a quarter sized piece of wax between the folds of the cheesecloth and rub it everywhere you have used the chalk paint. You will notice it shows up darker initially but dries quickly. Using a cheesecloth is the only way I have found of making the wax disperse evenly, otherwise it will streak...but sometimes that adds to the vintage distressed look. Wax will help the chalky finish not to get on people's hands or walls as they handle the window.


11. Follow the directions for how to install the hanging kit. The one I use comes with two D-hooks (one on each side of the window). If you install them lower, you won't see the wire above the window, but the window may hang away from the wall a little more and the wire will show through the glass. If you install the hooks higher on the window it will hang flesh with the wall but the wire will be visible.


12. To "gift wrap" this I suggest getting a large gift bow to stick on the corner, or buying large gift tags that you can tie with twine or ribbon diagonally across the top. I also save the hanging kit original packaging with the wire and instructions and hang it from the back of the window so the recipient can know how to finish the hanging process.


These normally take me one whole afternoon/evening because of painting, waiting an hour, flipping, drying, etc. Sometimes the following day I go back over the paint marker spots again to make them thicker.
What do you think? Have you re-purposed old windows before? Please share any tips or thoughts you have on the process!
Also, if you would like to buy one of these windows from me, I'd love to make one for your home. If you can pick them up in Warsaw or Huntington, I'd be happy to work with you to come up with a design and color scheme you like. Depending on what color paint/how much writing you select, the price would vary. Comment below if you are interested!